Search This Blog

Monday, 6 June 2016

Weekend in London

Hey everyone,

Well this weekend has been a busy one for me I spent a wonderful two days there. On the Saturday I went to see The Lion King at the Lyceum Theatre and on the Sunday I went to ZSL London Zoo in Regents Park. I must say that The Lion King was an amazing experience the costumes, acting, singing and set work were all so well put together I was transported to Africa by the realism. The costumes weren't exact replicas of the Disney animation, they were more tribal and you could see some of the puppeteers, however this just added to the experience. As the show was in the evening I decided to take some touristy photos in the day! Also this is kind of an outfit post as well as I composed a little London capsule wardrobe for the trip, so enjoy the photos from that too. ZSL London Zoo was very large and my feet hurt afterwards, but it was well laid out and the animals all looked well looked after, which is always my primary concern when going to the zoo.

So here is me ready to head off to London... yes this is the first post in which I have included my face.

Shirt-Primark £10
Trousers-Select £? Think they were about 10 but not sure, sorry.
Bag- Cath Kidston (no price as it was a gift)
Socks-River Island £8 (for 3 pairs)
Shoes-Primark £12
Earrings-Simply Silver £30

Arriving in London and being touristy...


Getting ready for The Lion King...


Dress- Dorothy Perkins £30
Shoes-Primark £3
Tights-Primark-£2
Earrings-New Look £2.50
Hair bow-New Look £3.99

Finally there... EEEeeeep excitement here !!


Day two outfit, It was warm so I just used the shirt as a cover up as sunburn and pale skin =Pain


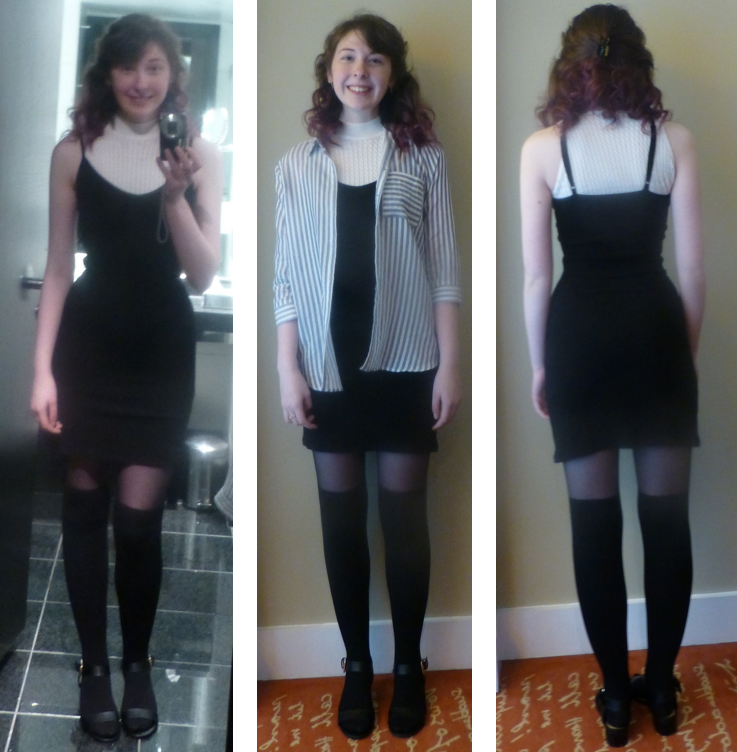
Top (worn underneath)- Primark £6
Dress-ASOS £15.99
Tights-Primark £3
Shoes and shirt as before in previous outfit photos above.

The Zoo in the sun and a sleepy tiger!!!


Thanks for reading, let me know if you have done any of these things especially The Lion King!!
Jennifer x

Tuesday, 31 May 2016

Malvern Food Festival

Heyy everyone,

So this week I ventured out to the local Malvern Food Festival. This featured lots of local producers of everything from chutney to cake, of which there was lots of free samples...I'm now chubby. The Festival featured a man on stilts, BBC Hereford and Worcestershire, a live demonstration and street food vans. Below are some shots I got of the day, hope this interests you.

So this is how the festival looked from various angles, as you can see it got quite busy.


So from some of the samples we decided we liked it so much we went back in disguise a couple of times for more... only kidding, we actually decided to purchase some of the delightful goods on offer.
An array of Jams, chutney and sauces...


Followed by a fudge overload of deliciousness...


And finally a local community recipe book. (watch this space as I intend to trial some of these recipes)


Thanks for reading,
Jennifer x 

Monday, 23 May 2016

Disney Painting

Hey everyone!
So today I decided to post an artsy but simple painting. I copied the design of this from the lantern painting in Tangled, but I put my own twist on it (the hair) as it was for somebody else. Below you can see the original from the movie and my easy step by step process of creation. I apologise in advance for the poor quality of the photos my camera decided to have no charge, so they were taken on my phone instead.

Here's the original...

I started out by doing the background, so I began with the hills then I did the skyline. I did this by blocking in colour then blending in the lighter and darker tones.


I then started adding in details by blocking in the shapes of the trees, I then refined them with daker and lighter tones and detailing.


Next stage was to add the lanterns, I used a sponge to blurred and block in the shapes then perfected with a brush. I also used a few small blobs to make up the figure, a stroke of hair and voila done... see how easy this was.


Thanks for reading!
Jennifer x

Tuesday, 17 May 2016

Healthier Alternative Cheesecake

Hey everyone,
So I decided to make something with some leftover tofu. Gross I hear you say, actually in this recipe it adds consistency and it tastes delicious, but don't take my word for it make it yourself! This recipe is for a Key Lime Pie style 'Cheesecake', I will guide you through how to make the base as well, but your welcome to be lazy and use whatever crushed biscuits you fancy* (I recommend Lotus Biscoff biscuits as I'm slightly obsessed with Biscoff, watch out for a cooking post involving it, in some form soon).

So let's get to baking then...

Base 
Ingredients:
  • 170g plain flour
  • 50g sugar
  • 1/4 tsp bicarbonate of soda
  • 3 tbsps honey
  • 50g coconut oil
  • 87g coconut cream
  • 1 egg yolk
  • 100g coconut chips
Method:
  • Preheat the oven to Gas 3/ 160C/325F and line a baking pan with grease proof paper
  • First of all mix the dry ingredients together in a large bowl ( sugar, bicarb and flour).
  • Then melt the coconut oil and honey in a saucepan over a medium heat until liquid state.
  • In a separate bowl whisk together the egg yolk and coconut cream until fully combined.

  • Once slightly cooled, a little bit at  a time, whisk the oil mix into the egg mix until fully incorporated.
  • Then a little at a time pour wet ingredients into dry and mix thoroughly until you have a wet dough, then add in the coconut chips and combine.
  • Scoop with a table spoon onto your prepared baking tray, leaving space for spreading(see my example).
  • Place in the oven and bake for 20-30 minutes.
  • Remove from the oven and leave to crisp up and cool down**.
  • Once cooled crumble up the cookies into large chunks and add to a food processor, processing until you have a fine crumb.
  • Melt 1tbsp of coconut oil with 2tbsps of golden syrup in a microwave for 30 seconds, then slowly add to the processor, mixing after each edition.
  • Grease a freezable pie dish and press the cookie crumb mix evenly into the dish.
 * If doing the lazy version just follow from the third step from the end.
**If you simply wanted to make these as cookies just ignore the last three steps and you're finished. 

'Cheesecake layer'
 Ingredients:
  • 1/2 block of firm tofu
  • 163g coconut cream
  • Juice of 2 limes
  • 2tbsps of honey
Method:
  • Put all ingredients into a food processor and blend until smooth.
  • Scrape the tofu mix into the prepared pie crust and spread into an even layer.
  • Place in the fridge to set for at least a hour and remove when ready to serve for the same or next day.
  • Alternatively this can be made in advance and kept in the fridge for a month at most, just remove a hour before serving to defrost. 
Hope you have fun experimenting with this recipe!
Thanks for reading,
Jennifer x

Tuesday, 10 May 2016

Creating a Lookbook

Hey everyone,
For this post I decided to make Uni work fun and create a look book for my portfolio. So I grabbed my awesome friend to model for me and chose a location with a beautiful cherry blossom to match my theme. As you'll be able to tell from the Kimono style sleeves this was inspired my Japanese fashion, I researched into Japanese Designers in Paris for this project , which was my first Uni project. Obviously Kenzo and was a major influence, which is why I chose to hand paint the sleeves on my garment, a traditional Japanese print technique. So have a gander at my look book photos, also I threw in a few unedited ones, as we had so much fun shooting them.
So I just did this on Photoshop by duplicating the layer then making the bottom layer black and white. To complete the effect I used the rubber on the top layer everywhere I didn't want colour.

Below are some fun photos from the shoot and my photogenic model. 


Thanks for reading, as always. 
Let me know what you think of this post !
Jennifer x


Friday, 6 May 2016

Altered Outfit

Hey everyone,
So as promised here's an outfit post from my altered skirt. Hopefully this shows you how easy styling your own outfits can be. *To see how I got my skirt please refer to my alteration post 'Making it Better' (25th April 2016).

 Shirt-Primark
 Cami- New Look
 Skirt-*see note above
 Boots-New Look
 Earrings-New Look

Sorry there are no prices on this post, as the items aren't new so I'm not sure of the price and wouldn't want to misinform you guys.


This is just a quick post for today, but I'd love to know what posts you guys enjoy more or what you think of my posts e.g. improvements or what you like most.  Please feel free to comment in any of my posts this one or previous ones, your feedback would be appreciated !!

Thanks for reading,
Jennifer x

Monday, 2 May 2016

Grrreat Granola Bites

Hi everyone,
So this week I realised I've done a fashion post, a fun(ish) post and now to stay true to the Blog I'm doing a food post. Granola bites are my invention from messing around in the kitchen, my sister tried one and then devoured the batch... and now demands them all the time. luckily they are quick and easy to make. Just as a note you can use store bought granola and skip the first half of the recipe to make your own granola. However, if you want them to be a proper Peanut Butter and Jam combo this recipe shows you how. I love Peanut Butter by the way!!!

Part 1- Granola 

Ingredients
  • 4tbsp Coconut Oil
  •  75g or a 1/3 of a cup of Peanut Butter
  • 280g or 2 cups of Oats 
  • 125g or 1 cup of Rice Krispies
  • 2 tbsps of Honey
 Method 
1 .Preheat the oven to Gas 3/325F/165C and line a wide baking pan with parchment.
2. In large saucepan over a low heat melt the Coconut Oil, until it turns into a liquid state.
3. Once melted add the Peanut Butter and stir to combine.

4. Once melted add in the honey and melt until you have a liquid mixture.
5. Add in the oats a little at a time until they are completely coated, then mix in the krispies.
6. Pour into the baking pan and spread into an even layer, bake for 20 minutes, tossing after 10 minutes to ensure an even bake.
7. Once browned remove from the oven and leave to harden for 30 minutes.


Part 2-Making it delicious

Ingredients
  • 280g or 2 cups of Oats
  • 55g or 1/4 cup of Peanut Butter
  • 115g or 1/2 cup of Blueberry or Raspberry Jam ( Half for melting half for the layer)
  • 55g or 1/4 cup of mix ins (I used peanuts you can use nuts or fruit or a mix of both)
Method
1. In a large sauce pan add half the jam and all the peanut butter, melt gently over a low heat.
2. Once melted turn off the heat and add the granola, oats and mix ins in alternative batches until completely coated.


3. Line a deep baking pan and add half of the mixture to the pan pressing it down into a even layer.
4. Heat up the remainder of the jam until melted and spread evenly onto the layer of granola.
5. Next add the remainder of the oat mixture on top of the jam layer and press until even.


6. Transfer the pan to the freezer for 20 minutes, then refrigerate for 1 hour.
7. Once they have set you can cut them into bars or squares and munch away.

They should be kept refrigerated and will last for about a week I guess but they never last that long in my house! 

Hope you enjoy the recipe and the results! 
Thanks for reading
Jennifer x